What is DANE?
DANE, which stands for Data Automation and Network Emulation, is a dataset generation tool that can emulate diverse ranges of network traffic representative of the real world. The DANE tool allows us to custom configure network conditions such as latency and packet loss and generate network traffic data associated with the configured conditions. DANE uses
We have modified DANE to suit the needs of our project. Our version is built on top of Viasat’s own fork of DANE, which itself is the product of a previous HDSI capstone team.
How to generate data with DANE
Below is a tutorial on DANE using Linux machine.
1. Environment Setup
The following packages are required to use DANE for data generation:
makedocker.iodocker-compose
Next, you can install the modified DANE repository using:
git clone https://github.com/jenna-my/modified_dane --recursive
(The recursive call is quite important!)
Lastly, navigate to the modified_dane directory and run the following to complete the installation:
sudo dockerd &

sudo make build
2. Configure different network conditions with DANE
Now that DANE is installed, you can begin configuring the network conditions that you wish to emulate. You can input multiple custom network conditions by editing the config.json file, which contains the configured network parameters for each DANE run.
To edit the config.json file, run:
nano config.json
Below is a sample configuration of one DANE run in the config.json file.
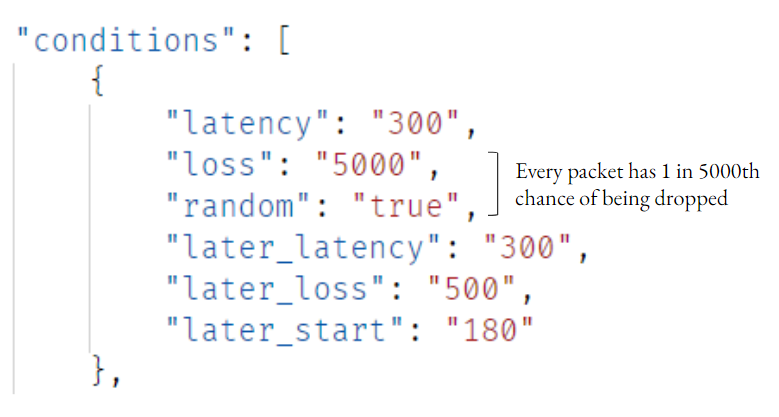
As you can observe, there are a total of six configurable conditions:
latency- the latency in msloss- the denominator of the packet loss ratio. For example, if set to 5000, you are setting the packet loss ratio as 1/5000.random- whether to randomly or deterministically drop packets. If set toTrue, packets will be dropped randomly from a uniform distribution. This means that if, for example, the loss was set to 5000, then every packet would have a 1 in 5000th chance of being dropped. If set toFalse, packets will be dropped deterministically. For an example loss of 5000, this would mean that every 5000th packet would be dropped.later_latency- the latency in ms which will be applied later in the DANE runlater_loss- the denominator of the packet loss ratio which will applied later in the DANE runlater_start- the second at whichlater_latencyandlater_lossshould be applied
You may also input multiple parallel runs of distinct network conditions by adding another set of these conditions within the brackets. Simply have as many configurations as you want (we recommend no more than 3-5 depending on your machine’s computational power) within the conditions list in the same format as above.
3. Run DANE Test
After configuring the network conditions, you may now run DANE by typing:
sudo make up
The DANE test should begin executing and can take about 8 minutes to run. However, you may stop the test whenever you’d like by opening a new Linux session and typing:
sudo make stop
4. Retrieve data
For each run, DANE should be outputting two csv files: the raw network data and the losslog data. The raw network file contains the traffic data for that particular run, while the losslog file contains the actual dropped packets. The losslog file allows us to calculate the empirical number of dropped packets for the DANE run.
These files should be automatically downloaded into the Linux directory. With a Windows system, you may also use WSL to access the files.
Troubleshooting
Some common problems when running DANE include having no new networks for the containers to run the simulations in. in these situations, one can run
sudo docker network prune
or
sudo docker system prune
to clear any dangling processes that may be taking up resources on the machine. This followed by a call to sudo make build should bring DANE back up to a general working order. We recommend a fresh reinstall following the instructions from the top if you continue encountering problems.